Wednesday, December 10, 2014

Flowers and Snowflakes (Toilet Paper Roll Craft)

I love to do crafts with the kids!  Even more so when we can recycle and use what we already have around the house.

Even MORE so, when it's pretty and useful and something we can keep forever and ever!  :) 

Which was why I absolutely adored this easy Christmas ornament craft I did with the kids. 

It can be as easy or as "complicated" as you want!

Supplies:

Empty Toilet Paper and/or Paper Towel Rolls
Scissors
Glue (I used Super Glue and Elmer's Glue...but you can just use Elmer's)
Markers/Crayons/Paint
Glitter

Directions:

Decide your thickness and measure along your cardboard tubes to mark where you will cut.  I did about 3/4 of an inch.

Flatten your cardboard tubes, and cut.

For the kids, I then gave them each five cardboard pieces at a time to color with crayons and/or markers.  I just let them do whatever they wanted.

When they were done, they gave me the cardboard and I used super glue to attach them together into a "star" (I chose to use five so it was more of a star, but you could easily use six if you wanted).

Once they dried, and it was relatively quick since I used super glue, I put some Elmer's glue on a paper plate and spread it out.  The kids were able to dip the "flower/star/snowflake" into the glue and then sprinkle glitter over the top. 

We didn't even add a string, they sit right on the branches of the tree very easily.  They make great adornments for gifts as well! 


My oldest decided to make a poinsettia, so she colored hers red and then sprinkled red glitter on the top.  After that dried, she added some glue to the middle and sprinkled some gold glitter over it make it look more like a flower! 


The pictures don't do these justice, they sparkle so beautifully on the tree!

Of course, I couldn't let the kids have ALL the fun!  I made a few of my own, but since you all know I'm addicted to SPRAY PAINT, I made mine just a wee bit differently than the kids made theirs.

To make mine, I glued them together first with my trusty super glue, and then I gave them a quick coat of gray primer. 

After a few minutes, I gave some of them a coat of silver spray paint, and I liked my daughter's poinsettia idea so much, I gave some a coat of red spray paint (I had all the paint on hand from previous projects). 

I could have sprinkled glitter on them while they were drying for an all over sparkle, but instead I chose to do just the front edge like the kids had done. 


I have a "theme" tree in my dining room this year, with silver, and purple being two of the main colors...so I put silver glitter on some of my silver snowflakes, and purple glitter on some of the others.

I also made some poinsettias the same way my daughter did (she's a creative cookie! Take after her mama? Hehe!)


Monday, December 1, 2014

Christmas Book Countdown

We love books in this family.  I noticed we had more than enough Christmas/Holiday books to count down to Christmas with last year, so when I saw this fun activity on Pinterest, I knew we would have to do it. 

I think we've got ourselves a new holiday tradition!


We simply went through our bookshelves and pulled out all of the books that had Christmas or holiday stories. We counted them out, and since we had more than enough, we put either 1 or 2 books in stack to count down for 23 days. We left The Night Before Christmas unwrapped for the 24th day (and of course we looked at it more often than just that 24th day, my girls LOVE the poem and even at their young ages have it mostly memorized).


I chose two rolls of wrapping paper that coordinated well with my family room, and we got to wrapping. The girls loved helping, and it was fun for us. The girls were able to practice their wrapping skills. :)


It was also a great way to make sure we didn't end up reading the same two or three Christmas books that the girls happened to see on their bookshelves first every night of December.  This way we were sure to go through all of the books and have some variety. 

The girls were so excited to unwrap their book every night!


Saturday, November 1, 2014

Thankful Tree


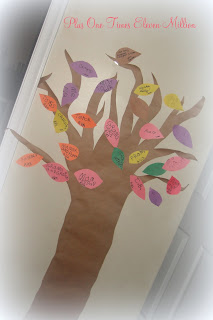
For one of our Thanksgiving crafts every year, we made a Thankful Tree.  It was a big hit with our daughters and really got them thinking about the things in their life that they were thankful for.  And not only that, but it was great writing/spelling practice for my girls, given their ages.


I made a tree trunk out of a roll of brown craft paper, just a freehand sketch and cut it out. 

I used Scotch tape to tape it to the wall, and even rolled a few branches around a bit to make a bit of a 3-D effect. 

Then, the girls and I cut out leaves of various colors and filled a basket of them, along with a marker. 

Then we sat down and thought of things we were thankful for. 

It was so funny some of the things the girls would think of!


Yep, that says Ava is thankful for "Toylit Papr" (read: toilet paper).  Yeah, I'm thankful for that too, kiddo...haha!

We left the basket out all month long so the girls could add to it, and mommy even added some too :)


This was fun, and easy, and we already had all the supplies on hand, though a roll of brown paper and a pack of construction paper don't cost much.